Tuesday, October 18, 2011

Treat Bag Leftovers

If you saw my post from Sunday and the one from last Wednesday, you'll understand why I had some leftover Kraft paper ovals!

So, I was looking at these ovals and thinking that I should use them somehow. After sponging them with Sunset ink and then a little Barn Red on the edges, I put three together like this...
...and got a pumpkin!

The stem is from Milepost Shapes. I just cut it in half and inked it with Cocoa to use as a stem.

Now I had a perfectly good pumpkin with no where to go! So I made a home for it. I thought a pumpkin carving layout might be appropriate. I'll have to wait for the pictures but I know I need to have about 4 pictures with a portrait orientation! What other type of layout would be good for a pumpkin besides this one, Halloween, or going to a pumpkin patch? Cute as a Pumkin?

I am almost done with my Dreamin' paper pack. I've gotten a lot of mileage from it but it is also nice not to have too much leftover. I think I am finally appreciating the new packaging for the Level 2 papers.
Here is the double layout side by side.
Here is the left side of the layout with the pumpkin.
Here is the right page of the layout. The blank Colonial White fancy square can be for journaling.
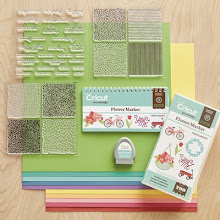
Supplies used (all CTMH): (X7142B) Dreamin' Level 2 paper pack, Leftover ovals from Kraft paper, (Z2191) Sunset stamp pad, (1245) Olive cardstock, (Z1464) Milepost Shapes, (Z697) Round Sponge
Pin It

Monday, October 17, 2011

Sit Back and Enjoy the Ride

I tend to create a lot of cards with floral themes which isn't necessarily the type of look I want when sending something to my dad or brother or someone male! So I've been trying to create more masculine types of cards just to keep on hand. I used two of my new stamp sets, Enjoy Life and Two Step Backgrounds on my card.

Enjoy Life:


Two Step Backgrounds:


I used the colors from The Play Date Cafe Challenge PDCC103 to help me along. I love that these colors can work for a masculine card yet there is no brown in them! It seems that I always revert to brown for masculine cards so it's nice to play with a brighter palette.


Here is the card I came up with.
Supplies used (all CTMH): (X7141B) Elemental Level 2 paper pack, (C1439) Enjoy Life stamp set, (D1473) Two-Step Background stamp set, (Z2125) Grey Wool stamp pad, (1447) Autumn Terracotta stamp pad, (Z2192) Pacifica stamp pad, (Z280) Natural Hemp, (1385) White Daisy cardstock, Scrap of Grey Wool cardstock, Scrap of orange paper from my stashPin It

Sunday, October 16, 2011

Lucky Little Pumpkin Studio J Layout

I've been neglecting my Studio J layouts! I usually place an order every month but didn't have time to last month with school (and work) starting up. I finally had some time to play and I was inspired by the Heart 2 Heart Challenge Blog. The challenge was to do a layout and journal/tell a story about your pictures. I had this idea in my head since Monday but only got a chance to work on it today! Anyway, it's about a cute little pumpkin that actually survived and grew in our tiny, somewhat dim backyard garden. Click on the picture and it should enlarge for you so you can read the journaling. Enjoy!
Pin It

Fall Themed Treat Bag and Waxy Flax Quick Tip

During my last workshop, we made treat bags out of the Kraft Die-Cut Cards. This is what a card looks like without any embellishments.

Here is a card with an oval window cut out of the front with the Cricut Art Philosophy cartridge.
Check out this post from last Wednesday for Pamela O'Connor's directions on how to make the treat bags. Here is the embellished treat bag with fall themed papers and die-cuts. I still need to add a ribbon to the top to tie the flap shut (or you could add velcro underneath).

I wanted to show you a quick tip about Waxy Flax. It's a great embellishment for cards and layouts which doesn't add a lot of weight or bulk. One neat thing about Waxy Flax is that it can keep it's shape. So if you twirl it around a toothpick like this:
...it will hold it's shape like this:

 Supplies used (all CTMH): (Z2135) New England Ivy stamp pad, (Z2191) Sunset stamp pad, (Z1686) Cricut Art Philosophy cartridge, (B1395) So Grateful stamp set, (X7142B) Dreamin' 2 paper pack, (1385) White Daisy cardstock, Olive Waxy Flax
Pin It

Saturday, October 15, 2011

Happy Day

Wouldn't this sketch make a pretty card all on its own? I love it!

This sketch is from the Clean and Simple Stamping blog. I had a chance to stamp and make cards with Heather and Debbie today so that got me in the creative mood. It also helped that I had my stamping supplies out and that I got a new order of stamps and embellishments in the mail today! So exciting! Check out that corrugated star...it comes in the package of Milepost Shapes. I broke out my new Blue Ribbon stamp set to make my card.

My mom is so sweet and always sends cards for special days. It's not as easy as it used to be for her to go out and get cards from the store, so I try to send her a bunch of handmade cards every once in awhile. She always goes through them faster than I can make them though! Anyway, I'm hoping to make duplicates of this card to include in a package for her (along with some others).

Supplies used: (C1464) Blue Ribbon stamp set, (X7139B) Typeset paper pack, (Z2165) Juniper stamp pad, (Z2162) Honey stamp pad, (Z2114) Cocoa stamp pad, (Z1484) Milepost ShapesPin It

Tuesday, October 11, 2011

Happy Hauntings Card

Here's another project I created after being inspired by my scraps. I had a number of those fancy shaped white rectangles left over from experimenting with the Art Philosophy cartridge so I'm using them now! The orange paper on the card is very old CTMH paper and the gray ribbon is very old CTMH ribbon. And I think I've mentioned this before but I just adore that little fence that you can cut out with the Cricut Art Philosophy cartridge. It's so intricate and detailed. I'm still a bit in awe at what the Cricut can do since I'm a new user. After every cut I have to show someone in my family and say, "Look at this! Isn't it amazing?"

Supplies used (all CTMH): (Z1686) Cricut Art Philosophy cartridge for fence and shaped rectangle, (C1423) Captured Moments stamp set, (Z2105) Black stamp pad, (Z726) Sponge Daubers, (1385) White Daisy cardstock, (Z1410) Antiqued Copper Designer Brads, (Z1263) Bitty Sparkles, Gray Organdy ribbonPin It

Sunday, October 9, 2011

Fall 2005 Layouts

I spent some time organizing my scrap paper yesterday. I've had a variety of systems to keep scraps over the years. I started off with a file box and file folders. This worked for awhile but I needed the file box for something and by then I had acquired quite a lot of scraps. Then I switched to keeping them in the pocket dividers that came in a Cropper Hopper vertical paper holder. This was probably my worst system. It was very difficult to reach the small scraps that had fallen way down into the dividers. I couldn't open them up the way I could with a file folder. Most recently, I've been keeping them in two 12" x 12" plastic drawers...which was definitely not enough space. Yesterday, I cleaned out another drawer and divided my scraps between three drawers. Now, one drawer holds my neutral scraps (white, off-white, browns, blacks, and grays). One drawer holds my green and blue scraps while the last holds purples, pinks, reds, oranges, and yellows. I could probably benefit from using two or three more drawers but right now I can't expand anymore!

Anyway, looking at all of my scraps inspired me and that's what it's all about! I started cleaning up my desk just a bit and found some cute photos of my kids from 6 years ago (yes, I still have a lot of organizing to do). So I used these pictures, some scraps, some old embellishments, and some new stuff to make the layouts below. I love the background paper on that second layout and I didn't want to cover it up too much so I tried to keep my embellishments to a minimum.


Supplies used (all CTMH): (Z1686) Cricut Art Philosophy cartridge for leaves and shaped journaling blocks, (Z2114) Cocoa stamp pad, (Z726) Sponge Daubers, (X7142B) Dreamin' Level 2 paper pack, (Z1450) Color-Ready Alphabets Cork, (Z1127) Chocolate Designer Ribbon Rounds, (Z1333) Opaques Mocha Adhesive Gems, (Z1410) Antiqued Copper Designer Brads, Noteworthy stamp set for the lines on my journaling block, Foundry FlourishesPin It

Friday, October 7, 2011

Buttoned Up Card Set Video

This video shows how to make the cards on page 93 of the 2011 Autumn/Winter Idea book. It also gives some great tips on how to use your Cricut art Philosohy cartridge. Take a look.Pin It

Wednesday, October 5, 2011

Treat Bag Made from Kraft Die-Cut Card

Pamela O'Connor, an Independent Close To My Heart consultant from Texas was kind enough to share how she made some awesome treat bags using the Cricut Art Philosophy cartridge. I used her directions to make my treat bag below. She set her Expressions machine at Left/Right: 1-3/4" and In/Out: 11/16" to cut out oval (3) at 2-1/2" in the front of the card to make a window. You could also use the Cricut Art Philosophy cartridge to cut out one of the many cards which already have a window in the front or you could use a die (like Nestabilities) and place it where you would like on the card. Score a line 1" on either side of the main fold of the card to make a mountain fold on what will become the bottom.

I love that intricate fence from the Art Philosophy cartridge! I also used my cartridge to make my letters for, "Boo!" Now here's a challenge for you. Do you know what retired CTMH paper pack the blue paper is from? I don't know if you can tell from the picture, but it is a B&T paper (a patterned piece of paper). It kind of has a bit of a mottled pattern on it. You can get the same effect by using Indian Corn Bue Cardstock and sponging it with Sunset. And it's old enough that there is no pattern on the back of it. What's your guess?

Supplies used: (Z2135) New England Ivy stamp pad, (Z2191) Sunset stamp pad, (1488) Black stamp pad, (Z1686) Cricut Art Philosophy cartridge, (B1395) So Grateful stamp set, (S1108) Wicked stamp set, (X7144B) Mischief Level 2 paper pack, (1385) White Daisy cardstock, (Z1248) Juniper Waxy Flax, (Z1249) Sorbet Waxy FlaxPin It

Monday, October 3, 2011

H2H 76 and CFC 22

This had the potential to be a relatively quick card, except that I was trying to help both of my kids with their homework at the same time! I think I prefer my 3rd grader's multiplication to my 8th grader's geometry!

Anyway, I combined the current Heart 2 Heart sketch challenge (H2H 76) and the current CAS-ual Fridays (CFC 22) challenge.


The CFC22 challenge is to "Create a Clean And Simple project using a ribbon tab or loop. Big loops, tiny loops...get creative but the loops on a bow don't count."

I thought that both challenges were good ones to help me use up some scraps, both of paper and of ribbon. I love it when I can do that! I also used one of my favorite techniques of having random squares and rectangles of scraps standing in to look like presents. Although my loops are supposed to look like bows, I didn't have to tie them into bows. Much easier!

Although the papers I used are "old" or retired, they just don't seem all that old to me! Didn't Close to My Heart just come out with these? The paper with the greens is from Veranda and the ones with the pinks and reds are from That's Amore. I still love them and for once, I'm glad I hoarded!

Pin It

Sunday, October 2, 2011

Wishes - Cards from Greeting Card Workshop

September has been busy with school starting (for both me and my kids), my daughter starting at a new school, and my son breaking his wrist! Whew! Well, I finally had some time to create! My wonderful upline, Wendy Vineis, had sent me the Wishes Card Confidence book awhile back. What a great resource! It has a multitude of beautiful card designs. I modified the "Greeting Card Workshop," on page 111 to create these cards:
The "Greeting Card Workshop," uses just three sheets of paper plus card bases (one patterned paper and two sheets of coordinating cardstock). You can embellish as much or as little as you like; keep them simple or dress them up! This patterned paper is from the retired paper pack called Sarsaparilla and yes, of course, I have been hoarding it! I thought it would work well for cards which could have a more masculine bent to them. Look for this in an upcoming workshop! I have a lot of sheets of paper floating about which I love but won't necessarily use for scrapbooking. I think this cutting pattern will be a good way to use my hoarded paper and to build up my stash of homemade cards.

Supplies used: (C1472) Bundled Buddies stamp set, (C1454) Horizon stamp set, (D1475) Card Chatter-Birthday stamp set, (D1444) A Little Thanks stamp set, (retired) In the Wild stamp set, (retired) Fanfare workshops on the go stamp set, Typeset stamp set, Lagoon cardstock, (1385) White Daisy cardstock, (Z2114) Cocoa stamp pad, (Z2103) Bamboo stamp pad, (Z2111) Chocolate stamp pad, (Z2195) Lagoon stamp pad, (Z2150) Sunflower stamp pad, (Z2125) Grey wool stamp pad, colored pencils, brads, (Z534) Micro-tip scissorsPin It
Related Posts Plugin for WordPress, Blogger...