Showing posts with label Say It In Style. Show all posts

Thursday, November 3, 2011

Wonderland Wishing You Well

My poor sister-in-law suffers from terrible migraines and actually had to be hospitalized this week so I wanted to send some get well wishes to her. When I saw the colors at CR84FN, they struck me as being very soothing and I thought they would work nicely for my card. I actually like them for any type of card and I think I will try to use this design with a different sentiment for a couple of birthday cards I need to make. I also used the sketch at Mojo Monday for my card's layout.

Here are the colors for CR84FN:

...and here's the Mojo Monday sketch:

This is my first easel card and I used Beate's video to help me along. I also used my Art Philosophy Cricut cartridge for the flowers, the circles, and the ovals. I was in the mood to roll flowers today!


Supplies used(all CTMH): (G1031) Wonderland stamp set from Workshop on the Go, (D1283) Say it in Style stamp set, (Z2119) Dutch Blue stamp pad, (Z2194) Sky stamp pad, (Z308) Liquid Applique, (retired) Sweet Home Level 2 paper pack, Buttercup cardstock, Dutch Blue cardstock, Grey Wool Cardstock, (Z1336) Opaques Pearl Adhesive Gems, Buttercup Waxy Flax, (Z1686) Cricut Art Philosophy CartridgePin It

Wednesday, March 2, 2011

Mojo 180 - Wishing You Well

I used sketch #180 on the Mojo Monday blog to make the following card for my mother-in-law who just had surgery on her knee.

The teacup and sentiment are popped up on foam tape. For fun, I used liquid applique sprinkled with cinnamon on top of the teacup to look like whipped cream or frothed milk. I had some ladies over for a card workshop last Saturday and we used liquid applique as frosting on a cupcake on one of the cards we made. We applied it to the paper which had the stamped cupcake, heated it up to make it puffy, and then attached that piece to the card. It wasn't the easiest thing to attach it to the card at that point since we didn't want to place our stamped image upside down on the table and possibly flatten our "frosting" while applying our tape runner to the back of the paper. We tried to apply adhesive to where the image needed to go on the card which also isn't that easy. So for this card, I attached all my pieces to my card, put the liquid applique on the part I need to, and then heated it up. Of course, my card warped after using the heat tool! But I just lay some flat items on top of the places it warped to try to flatten it out and it seems to be okay now!
 
Supplies used: (X7127B) Magnifique Level 2 paper pack, (A1109) A Sip stamp set, (D1283) Say it in Style stamp set, (Z2192) Pacifica stamp pad, (Z2125) Grey Wool stap pad, (Z1385) Designer Ribbon Blue Collection, (Z308) Liquid Applique, cinnamon, (Z1151) Foam tape
 
It was a challenge for me to make a square card. For some reason, I tend to stick to standard size cards but it was nice to try something different (my card is 5" x 5"). Here's the sketch from Mojo Monday.
Pin It

Monday, February 21, 2011

Tea Time

I love tea...and teapots...and teacups...and tea sets...and, well, you get the picture. You can imagine how happy I was to see the Tea Time stamp set in the 2011 CTMH Spring/Summer Idea Book. Here's one card I came up with using the polka dotted teapot and teacup. I don't know if the little flourish was meant to be 'steam' but I love how it looks above the teacups. This will be another one of the cards we will make at my 'Stock the Box' card workshop next weekend.

Supplies used: (C1438) Tea Time stamp set, (D1283) Say It In Style, (X7135B) Wings Level 2 paper pack, (Z2157) Vineyard Berry stamp pad, (Z2105) Black stamp pad, (Z1034) Ribbon Rounds Black Collection, (Z1151) foam tape, nestabilities

The While Supplies Last section on my website has a collection of discounted items including the black ribbon I used on this card. Check it out here!Pin It

Saturday, August 7, 2010

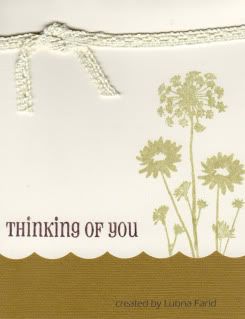
Thinking of You

I based my card on this card from the Clean and Simple blog. As I've mentioned before, I love simple cards but it takes me awhile to get them right, so they turn out not to be too simple for me. I do like how this turned out...after three tries! This stamp set (Treasure Life) is one of my favorites. I used a corner rounder with the guide removed to make the scalloped edge.

Supplies used: Colonial White cardstock (1388), Textured cardstock, Bamboo stamp pad (Z2103), Chocolate stamp pad (Z2111), Colonial White ribbon (Z1126), Treasure Life stamp set (D1306), Say it in Style stamp set (D1283), Corner Rounder (Z578)
Pin It

Friday, January 1, 2010

Happy 2010!


Happy New Year everyone! I hope you had a great start to 2010!

I've been thinking about starting a blog for awhile and thought that it might be appropriate to start it at the beginning of the year. I'm hoping that it will be a good way to share card and scrapbooking ideas and also to catalog these ideas for myself! Most of the items I use will be from Close To My Heart, since I'm a consultant, but I will branch out every so often. I'm also hoping that this will motivate me to use up my ever growing stash of crafting items!

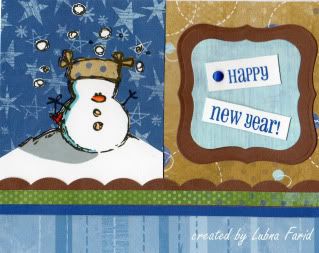
I've had a fun vacation from my day job as a preschool aide and one of the things I did was come up with a thank you card design to send to my students for the presents they gave me during the end of the year holiday party. This stamp set, Snow Friends, is one of my favorites so here's what I came up with, only I changed the sentiment here. With the thank you cards, I just stamped a, "Thank You," directly onto the light blue patterned paper from the Stardust pack. After making 15 of these, I needed a change and made a few New Year's cards!

Supplies used: (X7109B) Stardust Level 2 paper, (X5643) Chocolate cardstock, (D1244) Snowfriends stamp set, (D1283) Say It In Style stamp set, (Z2134) Moonstruck stamp pad, (Z2317) Crystal Blue marker, (Z2324) Grey Flannel marker, (Z2338) Orange marker, (Z2301) Autumn Terracota marker, (Z2310) Buttercup marker, (Z2316) Cranberry marker, (Z578) Corner Rounder, (Z534) Micro-tip scissors, (Z553) Bonding Memories Glue Pen, Nestabilities Labels One, blue brad (I just had this in my stash but it matches Moonstruck well!)

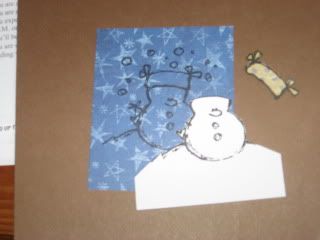
In case you want directions for the paper piecing part, here they are:
Stamp snowman image onto star patterned paper from Stardust paper pack. Stamp snowman image onto White Daisy cardstock and cut out snowman and snowflakes (don't cut around the arms or hat). Stamp same snowman image onto beige patterned paper (with blue dots and "stitched circles). Cut out the hat only.
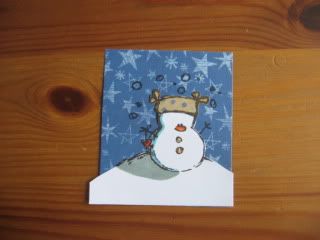
Assemble all snowman pieces together. Glue White Daisy snowman image and beige hat onto the blue star patterned paper. Trim White Daisy cardstock as needed. Use markers to color in stamped image.
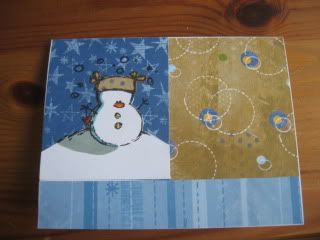
Attach blue star patterned paper to standard sized (4.25" x 5.5") card base on the upper left side. Attach a piece of beige patterened paper to upper right. Attach a strip of 1" x 5.5" light blue striped patterned paper along the bottom. Use corner rounder to add a scalloped design along one edge of a piece of .5" x 5.5" Chocolate cardstock.

Attach Chocolate cardstock strip, green patterned strip, and Moonstruck strip right over the top of the light blue striped patterned paper. Glue "snowflakes" from White Daisy cardstock (stamp and add more if desired). Assemble rest of card as shown.

Enjoy!
Lubna

Pin It
Related Posts Plugin for WordPress, Blogger...