Showing posts with label cards-embossed. Show all posts

Sunday, August 24, 2014

What a Hoot - Back to School Card

Here's a peekaboo card I made with the August Stamp of the Month, What a Hoot. It's such a cute stamp set and I decided to do some paper piecing with it.

I wanted to make a bunch of these so I worked in steps to set up all the components, assembly line style.
I used Close To My Heart's Woodgrain Embossing Folder. I actually had to spritz my Saddle cardstock with a bit of water before embossing because I had some cracking when it was just dry. I haven't have this issue with other colors of cardstock and other embossing plates from Close To My Heart but it was an easy fix and I like how it turned out. After embossing, I sponged Chocolate ink o my cardstock to highlight the texture.
I love how the Close to My Heart embossing plates are large. I can make a quick and elegant top fold card by just embossing my card front.

Next, I used my Nestabilities Circles and cut out some Pear cardstock circles.
After adhering these to the Woodgrain embossed cardstock, I cut smaller circles through both layers to create my peekaboo hole.
Here are my owl pieces. I love paper piecing since it's a good technique to use up scraps!
I ended up printing my sentiment onto Buttercup cardstock (now retired, so I'm using it up!).  I also used Buttercup as my card base. Here is most of my "assembly line," including the backing for my peekaboo circle.
The finished products!

Since I'm mailing these, I didn't want them to be too bumpy but I still wanted some dimension. I added a hole punch on either side of the sentiment and then added Liquid Glass on top to give the look of a brad. Here's a closer view.

If you're interested in purchasing, What a Hoot, it is only available in August for $17.95 or $5 with a $50 purchase. Click here to see the stamp set!


Pin It

Friday, December 27, 2013

Polar Bear Fun!

I love having some time off! It's been very difficult for me to get time to create with my new work schedule. I know, I should make the time, but when I see the dishes and laundry piling up, I figure I should make time for that first!!!  I even had time to go and get a bunch of new trimmer blades...I had been cutting with a dull blade for months now! It used to be that I could just pick up a Fiskars blade from Walmart or Target but my local stores don't carry them anymore. The nearest craft store is somewhat of a trek and it's a trek that's better done on a day off! Anyway, like I said, I love having time off!

I decided to do a bunch of cards which I could use as holiday, New Year's, winter birthdays, and thank you's. I picked the cute Polar Bear Holiday stamp set and the lovely To You and Yours set for the sentiment which I put on the inside using Outdoor Denim ink (some I'm leaving blank on the inside, like for the ones I'm saving for birthdays). The Polar Bear Holiday set has some great sentiments on it already but I really love the font on To You and Yours. The nice thing about the polar bear stamps is that I just needed to add a tiny bit of color with my Sky and Whisper CTMH alcohol markers and some colored pencils since they are white!

I also used the Frosted and Sparkle and Shine paper packs and Crystal Blue cardstock for my card bases because I had a lot of it! I don't know if you can tell from my pictures, but the front of my card is cut a little shorter so you can see the gray houndstooth pattern even while the card is closed and my card is slightly smaller than a standard size. It's about a 4" x 5.5" card with the front flap being 4.25" long. The Bronze Shimmer Trim and the Lagoon Houndstooth Washi Tape made for easy embellishments! I also used 3-D Foam Tape to pop up my sledding bears.

Here's a shot of my supplies. I cut out my circles using my Cuttlebug with Spellbinder dies (both regular and scalloped). I used an embossing plate to give some texture to the blue circles and inked them a little with Heavenly Blue ink (retired). In case you haven't heard, we will have embossing plates in the Spring/Summer 2014 CTMH Idea Book! Yay! We'll also have a bulk pack of sponge daubers!

Just for fun, here are my polar bears, cut out. Wheeeee! They look so happy! It really helps to have a good scissors like your handy dandy CTMH Micro Tip scissors

Here's the outside of my final card...
...and a view of the inside!


I'm linking up with 365 Cards for their Anything Goes Challenge. Seeing as how I always seem to be in need of cards, I think I should visit this challenge blog more often and get inspired!
Pin It

Monday, January 28, 2013

Simple Sympathy Card

Here's a simple sympathy card. I used my Cricut Artiste to make the roses, a Nestabilities die to make the deckled rectangle, and the Argyle Cuttlebug embossing folder. One of my favorite elements of the card is the tiny double bow. After reading this post by Allisa Chilton, I went ahead and purchased a Bow Easy and that is what I used to help me with this bow!

Supplies Used (All CTMH except where noted)--
Cardstock: Honey, Chocolate, White Daisy, Bamboo
Stamp Set:(D476) Card Chatter - Sympathy
Embellishments: Designer Ribbon Rounds Cocoa Collection, Opaques Pearl Adhesive Gems, Liquid Glass, Nestabilities Deckled Rectangles, Cuttleug Argyle Embossing Folder
Pin It

Thursday, June 28, 2012

Card Word Puzzle - Congratulations

One of my favorite stamp sets is Card Word Puzzle and I've been having fun trying out my copics on the gorgeous flowers in this set. I'm following along with Heart 2 Heart's current Wedding Challenge and Freshly Made Sketches #41.

Please keep in mind that I am a beginner in coloring with Copics so I'm sure I didn't exactly put my shadows where they should all be but I will continue to practice!
Here's a close up of the flower so you can see that I popped up the middle section with foam tape.

Supplies used (all CTMH except markers and embossing folder): (C1494) Card Word Puzzle stamp set, (retired) Silhouette Level 2 paper pack, Cranberry cardstock, (44751) Archival Black stamp pad, (Z1151) 3-D Foam Tape, Cuttlebug Victoria Embossing Folder, Copic markers

Don't forget...Stampaganza only lasts until Saturday! For every two My Acrylix® stamp sets (sizes A, B, C, D, or E) you purchase at full retail price in June, you'll receive a third stamp set of your choice (of equal or lesser value) for free!Pin It

Thursday, January 27, 2011

Friend Cards

Last weekend, I got together with some friends for our annual birthday get together. We are all Capricorns except for one who's birthday is actually in September! Here are the cards I made to give to my friends. I love the new pleated ribbons (Z1398 Wings Level 2 Assortment) and it was neat how just changing the color of the ribbon gave a slightly different feel to each card. The shoe and the word, "Friend," are embossed in black.


Supplies used: (X7135B) Wings Level 2 Paper Pack, (D1452) Find Your Style, January 2011 Stamp Of The Month, (Z1398) Wings Level 2 Assortment - pleated ribbon, (Z670) Black embossing powder, (Z1034) Designer Ribbon Rounds™ Black Collection

We attended one of the teas at Green Spring Gardens for our get together. If you are in the Northern VA area and haven't been to Green Springs yet, I highly recommend it. The tea programs are really wonderful. First, there is a presentation about a topic (the one we heard was about the botany craze of the 1800s and how indoor gardening became popular), then you walk over to the historic house for tea which includes finger sandwiches, pastries, and scones. Here's one of the pretty teacups our tea was served in.


Even though it's winter and the outdoor gardens are not in full bloom, the greenhouse showcases a beautiful indoor garden. Whenever I walk through there, I feel a sense of tranquility (even though this time it was a bit crowded with the people attending the program). I think I need one of these pretty chairs in my backyard!

I love how they displayed these tillandsias (at least I think that's what they are!).

 It would be nice to have a room like this in the house!

I think I am enjoying looking at these garden pictures so much because of the snow we got last night. It is, however, beautiful in its own right.

Pin It

Thursday, March 18, 2010

Embossed Cards

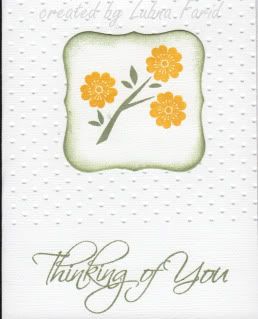
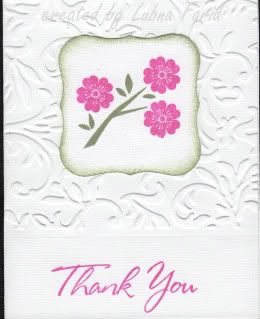
I love simple cards, but for me...they are just not always that simple to make! For example, I was inspired by this post on Ikki's Cuttlebug Cupboard. She has great tips on getting the most out of your Cuttlebug and I really wanted to try what she did with embossing the top part of a side folding standard card in portrait layout (check her blog...she has step by step pictures). I must have gone through three 12" x 12" sheets of textured white paper (aack!) before I finally got a decent card! I was trying to stamp directly onto the front of a folded card and it just wasn't working for me. Everytime I tried, I got a smudged sentiment. When I stamped before folding my card and before embossing my card, it worked much better. Anyway, here are my poor imitations of her technique and cards.


Supplies used: (X5671) White Textured cardstock, (C1340) Aspiration stamp set, (D1187) For Every Occasion, (C1381) Card Chatter - Thank You, (Z2120) Garden green stamp pad, (Z2162) Honey stamp pad, (Z2158) Watermelon stamp pad, (Z697) Round Sponge, nestabilities, Swiss dots embossing folder, Victoria embossing folder

There's just something about embossed white paper that is so elegant and beautiful. I think if I can ever get a whole bunch of these made with different unsmudged (!) sentiments on the bottom, they would make a nice gift set.

Pin It
Related Posts Plugin for WordPress, Blogger...