Showing posts with label Zoe. Show all posts

Sunday, July 3, 2016

Thank You Panda (Koala)!

I have long been waiting for Close to My Heart to come out with a panda stamp since that is the mascot of the school where I work. It would come in so handy for cards for the students and staff! 

By chance, I came across this amazing video tutorial made by Stephanie Davis. She shows you how to turn Close to My Heart's Cute Koalas stamp (D1642) into a panda! I do recommend watching the video but essentially you mask the koala's nose with a piece of tape when inking up your stamp. Before stamping, you simply remove the tape. In her video, she also masked the stomach but since I was using a different koala stamp from the same set, it ended up being too complicated for me to do that. Then you use a capital "O" and a lower case "o" to make the ring around the eyes. I was blown away! So of course, I had to try it.

Here are the ShinHan Touch Twin marker colors I used.

Here are all of the stamp sets I used.
The two from the Cricut Collection are both from the Cricut® Artfully Sent Collection
Since I would be coloring, I stamped with Memento ink to avoid smearing.

So, after taping off the nose and stamping the "O's," the koala looks a lot like a little panda (without a nose). The eucalyptus even looks like bamboo to me! 

Here's a progression of photos to show you how I colored the panda.


As Stephanie explains in her video, start with your lighter gray and then add shadows with the darker. Then go back in with the lighter to blend.


 Since pandas have a band of black across their chests where their arms are, I just colored in where I thought it would go.

Then I darkened it in!

I colored in the bottom and feet using the same concepts. Since I couldn't mask that "tummy" line very well, I just kept it in and used it!

Next, I colored in around the eyes and added a nose.

I used the Light Orange, just like Stephanie, for the ears and to add color to the cheeks.


After using the Colorless Blender, the ears and cheeks look more subtle and then I added Pastel Green to the bamboo.

I stamped, colored and cut out a bunch of pandas to begin with.
Don't they look cute!

Then I worked on the card base. I used papers from Zoe, Florence, and Magical. I also embossed strips of Pear.


I based my card design on a sketch from the April 2016 Cardmaps designs (the second one displayed on their page). I used the Cricut® Artiste Cartridge to get the notebook style cut in the upper left and CTMH's Scallop Border Punch on the red paper. 

I did use one retired product, which I miss a lot! Loved these borders but I did hoard them so I'm still able to use them.

 My final result was this card.

Since I had to make a lot of thank you cards, I ran out of my background paper so I subbed another similar one from a retired paper pack. Bonus points if you know the name of that paper pack!


Pin It

Monday, May 9, 2016

Tickled Pink Flamingos

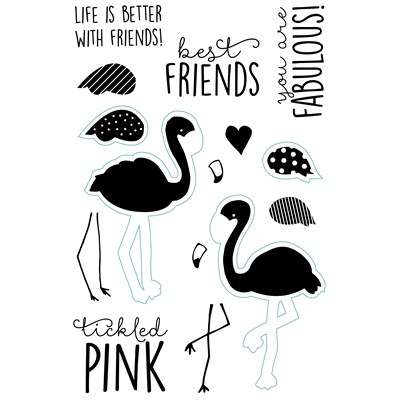
I tried to restrain myself when I looked through CTMH's Seasonal Expressions 2 . But when I looked at page 32 and saw the C1651 Tickled Pink stamp set with those cute flamingos AND that they also had coordinating thin cuts (Z3228), I just couldn't resist! Look at it!

So much fun! I started off by just die cutting a bunch of flamingos and wings with the Thin Cuts. Then I stamped!
It's a flamingo party!!!
I decided to make a simple card and here's what I came up with.
The polka dotted paper right behind the flamingos is from this month's gorgeous special Happy Times Paper Pack. The green polka dotted paper behind that is from the Zoe paper pack. I used Pixie and Smoothie stamp pads to stamp the flamingo bodies and wings. I used Memento Black for the beaks and legs. I usually don't hand draw but I saw a beautiful flamingo card online made by fellow consultant Susan Williams where she had outlined her text boxes so I decided to challenge myself and try it out. Let me know what you think!
Pin It

Sunday, January 24, 2016

All Decked Out Thanks Card

Luckily, our electricity and heat all stayed on during the blizzard so I hunkered down to make some cards...snowman themed, of course!  


As always, I am trying to use up my stash so I mixed and matched different patterned papers from Zoe (X7197B) and Georgie (X7203B), both current CTMH paper packs and from Snowhaven and Frosted, both retired paper packs. I also used the retired stamp sets, A Little Thanks and All Decked Out. The other new items I used were CTMH's Silver Foil Tape (Z3130) and some twine from the Dollar Spot at Target (which is already sold out).


I planned on making them in bulk so I went step by step. I stamped the hats on the green and white polka dotted paper from Zoe and on Cranberry cardstock so that I could have a red hat band. After cutting all of those out, I paper pieced them. Then I stamped the scarf onto the Canary cardstock, cut those out and colored some of the snowflake shapes on the scarf with the ShinHan™ Touch Twin™ Carmine Marker. That took a looong time. I stamped the snowman face and bottom on White Daisy cardstock, of course, and used the ShinHan™ Touch Twin™ Marigold Marker for the carrot nose. I cut the red Snowhaven rectangle with my paper trimmer at 1.5" x 3" and put the Silver Foil tape along the top. The gray chevron pattern is from Georgie and I used my Large Deckled Rectangles die from Nestabilities to use a background for the snowman. I used Chocolate to ink both these and the 5.25" x 4" beige Frosted background piece. As I was assembling, I was able to position the large "Thanks." and stamp in Chocolate. I loved how the red and white twine echoed the red and white in the Snowhaven rectangle and in the red on the scarf and hat of the snowman.


Whew! That's 20 cards --- which will get used up immediately!

Pin It
Related Posts Plugin for WordPress, Blogger...