Monday, July 29, 2013

Sneak Peek at Base and Bling Jewelry

I was very excited to see CTMH's new jewelry options in the Autumn/Winter 2013 catalog. There are several base pieces (necklaces, headbands, rings, cuff bracelets, and clips) on which you can put whatever creation you come up with. There are also several bling options which you can add to your base pieces such as gems, word accents, and floral accents. These could also be used on your scrapbooking, card making, home décor, or other paper crafting projects just as some of the embellishments already in this and past catalogs can work to make some cool wearable jewelry.
The pink/orange circles are the strong adhesive you can use to make and affix your creations to the base pieces.
 
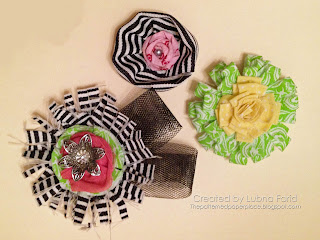
I had some time to create today and came up with a few fabric flowers to use on my jewelry. I used the Chantilly fabrics, Black Striped Grosgrain Ribbon, an Opaques gem, a new floral accent, some Black Tulle (soon to be retired!), and some old rosette ribbon in dark pink.


I used Velcro on the backs instead of the adhesive tape so I could switch out flowers if I wanted to.
 
I love the hair clip since it is so versatile! It can be used in your hair of course but you could also use it as a brooch, purse accent, flip flop accent, gift bag decoration, card embellishment, etc.


My daughter is wearing a fabric headband she made from an old T-shirt so she just clipped her floral piece to that. In case you're wondering, the pink in her hair is hair chalk!
 
There are many different ways to make fabric flowers and there are a ton of great videos on YouTube but here is a picture tutorial for the last flower pictures in my daughters hair.
 
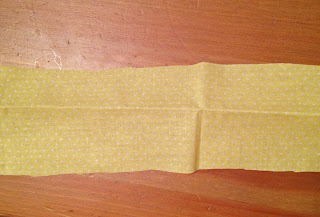
First cut a strip of fabric wide enough to fold in half. Two inches or more is a good width. This strip happened to include a fold already in it which was very helpful!
 Then fold it in half.
 
 Cut slits from the folded side so that you end up with loops. Don't cut all the way to the end. (I will need to trim the bottom of this strip a little bit.)
 
 Start rolling your folded fabric up. While I used the adhesive tape, shown in the first picture, on most of the flowers I made here, I used a hot glue gun on this one, along the bottom to keep the fabric rolled. I will experiment with some fabric glue too to see if that works.
 
 Keep rolling until you get to the end. If you like, repeat this with another color fabric to get a two toned flower as in the one I made above. Just glue it around your first flower.
 
These were a lot of fun to make!
 
Pin It

Friday, July 26, 2013

Free Spirit Birthday Cards

I mixed some old products (very old) and some new products for these cards. I used one of my favorite paper packs of all time, Free Spirit, and the new Holiday Tags stamp set (D1560) for the frame and sentiment. The frame is cut with the Artiste Cricut cartridge and popped up with some foam tape. I also used the Neutral Assortment of Baker's Twine and an old teardrop punch I had in my stash. I used Chocolate and Indian Corn Blue (retired) stamp pads. The rolled up candles are a good way to use up some small pieces of scrap paper. If you're sending the cards through the mail, you could keep it 2-D and use rectangular pieces of paper


Pin It

Thursday, July 25, 2013

It's a Boy!

We had some good news yesterday! My cousin had her baby! I broke out some of my new CTMH products to make a baby card. So here's a sneak peek at the new Babycakes paper pack (X7173B) and the new Wild Wonders stamp set (C1558), available on August 1st. The frame is from another new stamp set called Holiday Tags (D1560). I popped my frame up with a little foam tape. The Holiday Tags stamp set has a bunch of frames which can be cut with the Artiste Cricut Cartridge and the Wild Wonders has a giraffe and lion image which have coordinating cuts on the new Artbooking Cricut Cartridge. They were all so much fun to play with!
 
I usually don't add too much inside my cards but after looking at some examples of how other people do, I thought I might start incorporating some of my scraps on the insides. I like the weight it adds to the inside also. This way the card isn't too unbalanced. Here's what the inside looks like. I love all those floating giraffes!
 
There's an, "It's a girl!" sentiment in the Wild Wonders stamp set also. I think I could duplicate this card and leave the frame part blank or use the, "Too cute!" sentiment from the same set to have a baby card on hand for when I need one.

Some other supplies I used were the Slate and Autumn Terracotta stamp pads and the Neutral Baker's Twine Assortment.Pin It

Monday, July 22, 2013

Get Organized!

I love, love, love Close to My Heart's Organizers. This video shows a couple of different ways you can use the Large Organizer.

Pin It

Sunday, July 21, 2013

Free Digital Files from Close To My Heart

Close To My Heart is making some free artwork downloads available for a limited time. Go to their "Rediscover" page to download these (and more) You Make Me Happy tags available until July 31st!


Here's another digital idea for you. Is there a retired CTMH paper that you miss or that you need a little bit of so you can complete a project? Did you know that you can go into Studio J and print some of your favorite older papers? Or even some new ones which may only be available through Studio J. If you go into Studio J, click on New Project, Choose Photos later, and select the "No Limits" layout. Then pick the paper pack you are interested in. You can simply drag the piece of paper you want into the layout. In order to get two different patterns, make a large text box to fill one side (one page) of your layout. Delete the text in the text box and switch the paper from vellum to White Daisy. Then go into the patterned papers and drag your favorite into your text box. If you want samples of a number of papers from that pack, simply make more text boxes in the size you want your paper and use the same steps to fill them with your favorite papers. You could even select some of the coordinating stickease if you like those images. You could download your creation as a jpeg for $2.95 (and print however you like) or buy the double layout prints (two 12 x 12's) and get the jpeg automatically for $6.95. Pin It

Saturday, July 20, 2013

Pajama Party - July 31st!

Close To My Heart is teaming up with Big Picture Classes again to bring you a live webcast with step-by-step instructions for making this layout using the Cricut® Artbooking collection. Purchase the collection beginning August 1, 2013 and revolutionize the way you scrapbook!

The FREE webcast will air Wednesday, July 31 at 7:00 pm (MDT). During the presentation, you’ll learn to make several projects from a variety of sponsors, including Close To My Heart’s Artbooking layout, as our very own Kristine Widtfeldt walks you through the steps—and sneaks the Artbooking collection!

The Pajama Party class will be available for FREE at BigPictureClasses.com on July 31, and will be archived after the event for future viewing. If you would like to interact on the message board, participate in live chat, post to the gallery, download handouts, or enter any contests, you will need to log in to the Pajama Party “classroom” by creating a free account on the Big Picture Classes website. If you have already created an account or if you registered for the first Pajama Party in May, you are all set! You will not need to create another account or register again.
To make our Artbooking layout, you will want to have the following items—or similar products—on hand:
  • Z1906 Cricut® Artbooking Collection* - (you won't be able to have this on the 31st but you can rewatch the webcast when you receive your cartridge to follow along--watch it on the 31st for a preview of what you can do with the cartridge!)
  • 1301 Bamboo Cardstock
  • 1388 Colonial White Cardstock
  • X5668 Honey Cardstock
  • X5762 Lagoon Cardstock
  • X5930 Slate Cardstock
  • X5639 Sweet Leaf Cardstock
  • X5666 Twilight Cardstock
  • Z2160 Twilight Exclusive Inks® Pad
  • Z2173 Slate Exclusive Inks® Pad
  • Z1853 Aqua Dots*
  • Z1799 Silver Shimmer Trim
  • Z1151 3-D Foam Tape
  • Z1294 Sanding Kit
Pin It

Friday, July 19, 2013

Project Life CTMH Style Weeks 6, 7, and 8

How has your summer been so far? Relaxing? Busy? Mine has been a bit of both. I've had periods where I could really enjoy some down time and some periods where it's been pretty full--but all in good ways.

I had my Kids' Summer Scramping Art Camp during the first week in July and it was a lot of fun, but of course it kept me busy. I'll post some pictures from that soon. And I'm doing another one in August! We'll be using a lot of the items from the new catalog in August, like the jewelry making supplies. I'm really looking forward to it!

During some of my downtime, I've had the opportunity to do a little catch up with my Project Life layouts. Yay! We're on Week 29 in the year and I think I'm on Week 15 in my scrapbook. That's good for me!

My layouts for Week 6 are below. You can see that I took screen shots of "maps" to some of the places I drove to that week. Looking back through the years, I know that what is routine now will change, so I just thought it might be nice to document where we go at this moment in our lives! These two pages focus on the kids' activities and I included part of my daughter's Girl Scout Cookie order form. You'll see that I used the journaling cards that I made with Dotty for You from this post.


Here are the layouts from Week 7.


When I compare the layouts from these two weeks, I prefer the ones from Week 6. I think the journaling cards have a more finished look to them. I may still add something to Week 7's layouts (goodness knows I have enough embellishments in my stash to spare!) but I wanted to get these pictures in the album and if I don't add anything, that will be just fine!

The next two layouts are from Week 8. I used an old Level 1 Paper Pack which came with some coordinating Stickease. Using the Stickease on the paper was a fun way to build up a journaling block. I also used some directly on the photos.


Are you doing Project Life? Are you finding any challenges scrapbooking this way? I'm liking scrapbooking in a different way for me...although it's a lot like the way we used to display pictures (I know my mom used very similar photo holders in some of her albums!). Pin It

Thursday, July 18, 2013

Background Stamps


Pin It
Related Posts Plugin for WordPress, Blogger...