
Here's a great video that shows some tips on layering embellishments, adding journaling, and adding a title in Studio J.
Pin It
Saturday, November 19, 2011


Thursday, November 3, 2011
Wonderland Wishing You Well
My poor sister-in-law suffers from terrible migraines and actually had to be hospitalized this week so I wanted to send some get well wishes to her. When I saw the colors at CR84FN, they struck me as being very soothing and I thought they would work nicely for my card. I actually like them for any type of card and I think I will try to use this design with a different sentiment for a couple of birthday cards I need to make. I also used the sketch at Mojo Monday for my card's layout.
Here are the colors for CR84FN:

...and here's the Mojo Monday sketch:

This is my first easel card and I used Beate's video to help me along. I also used my Art Philosophy Cricut cartridge for the flowers, the circles, and the ovals. I was in the mood to roll flowers today!


Supplies used(all CTMH): (G1031) Wonderland stamp set from Workshop on the Go, (D1283) Say it in Style stamp set, (Z2119) Dutch Blue stamp pad, (Z2194) Sky stamp pad, (Z308) Liquid Applique, (retired) Sweet Home Level 2 paper pack, Buttercup cardstock, Dutch Blue cardstock, Grey Wool Cardstock, (Z1336) Opaques Pearl Adhesive Gems, Buttercup Waxy Flax, (Z1686) Cricut Art Philosophy CartridgePin It
Here are the colors for CR84FN:
...and here's the Mojo Monday sketch:

This is my first easel card and I used Beate's video to help me along. I also used my Art Philosophy Cricut cartridge for the flowers, the circles, and the ovals. I was in the mood to roll flowers today!


Supplies used(all CTMH): (G1031) Wonderland stamp set from Workshop on the Go, (D1283) Say it in Style stamp set, (Z2119) Dutch Blue stamp pad, (Z2194) Sky stamp pad, (Z308) Liquid Applique, (retired) Sweet Home Level 2 paper pack, Buttercup cardstock, Dutch Blue cardstock, Grey Wool Cardstock, (Z1336) Opaques Pearl Adhesive Gems, Buttercup Waxy Flax, (Z1686) Cricut Art Philosophy CartridgePin It
Wednesday, November 2, 2011
So Grateful - Heart 2 Heart Color Challenge
Happy November everyone! The last part of October just seemed to go by at lightning speed!
I unfortunately lost most of my files from my computer due to a virus (even though I do have an anti virus program). The main files I am really missing are my lesson plans from last year so I am having to take some time to rework those. I had just bought a memory stick to back up my files but, of course, didn't! Also some pictures of a couple of projects which I had hoped to post got lost as well. Sigh...I can retake them but I decided to move on and do something new!
This week the challenge at Heart 2 Heart is a color challenge: Terra Cotta, Juniper, Bamboo.

 Supplies used: (C1423) Captured Moments stamp set, (C1463) Harvest Happiness stamp set, (X7139B) Typeset Level 2 paper pack, (Z1248) Juniper Waxy Flax, (Z1249) Sorbet Waxy Flax, (Z697) Round Sponge, (Z1686) Art Philosophy Cricut CartridgePin It
I unfortunately lost most of my files from my computer due to a virus (even though I do have an anti virus program). The main files I am really missing are my lesson plans from last year so I am having to take some time to rework those. I had just bought a memory stick to back up my files but, of course, didn't! Also some pictures of a couple of projects which I had hoped to post got lost as well. Sigh...I can retake them but I decided to move on and do something new!
This week the challenge at Heart 2 Heart is a color challenge: Terra Cotta, Juniper, Bamboo.

Captured Moments is one of my favorite stamp sets but I haven't pulled it out too much so I thought I would play with it today using these colors. I also used Harvest Happiness with the Art Philosophy Cricut cartridge for the leaves up top. I decided to sponge the Colonial White panel, which has the main image stamped on it, in all three colors. What a nice palette for a fall themed card!

Tuesday, October 18, 2011
Treat Bag Leftovers
If you saw my post from Sunday and the one from last Wednesday, you'll understand why I had some leftover Kraft paper ovals!


So, I was looking at these ovals and thinking that I should use them somehow. After sponging them with Sunset ink and then a little Barn Red on the edges, I put three together like this...

...and got a pumpkin!
The stem is from Milepost Shapes. I just cut it in half and inked it with Cocoa to use as a stem.

Now I had a perfectly good pumpkin with no where to go! So I made a home for it. I thought a pumpkin carving layout might be appropriate. I'll have to wait for the pictures but I know I need to have about 4 pictures with a portrait orientation! What other type of layout would be good for a pumpkin besides this one, Halloween, or going to a pumpkin patch? Cute as a Pumkin?
I am almost done with my Dreamin' paper pack. I've gotten a lot of mileage from it but it is also nice not to have too much leftover. I think I am finally appreciating the new packaging for the Level 2 papers.
Here is the double layout side by side.

Here is the left side of the layout with the pumpkin.

Here is the right page of the layout. The blank Colonial White fancy square can be for journaling.

Supplies used (all CTMH): (X7142B) Dreamin' Level 2 paper pack, Leftover ovals from Kraft paper, (Z2191) Sunset stamp pad, (1245) Olive cardstock, (Z1464) Milepost Shapes, (Z697) Round Sponge
Pin It
Monday, October 17, 2011
Sit Back and Enjoy the Ride
I tend to create a lot of cards with floral themes which isn't necessarily the type of look I want when sending something to my dad or brother or someone male! So I've been trying to create more masculine types of cards just to keep on hand. I used two of my new stamp sets, Enjoy Life and Two Step Backgrounds on my card.
Enjoy Life:

Two Step Backgrounds:

I used the colors from The Play Date Cafe Challenge PDCC103 to help me along. I love that these colors can work for a masculine card yet there is no brown in them! It seems that I always revert to brown for masculine cards so it's nice to play with a brighter palette.

Here is the card I came up with.
 Supplies used (all CTMH): (X7141B) Elemental Level 2 paper pack, (C1439) Enjoy Life stamp set, (D1473) Two-Step Background stamp set, (Z2125) Grey Wool stamp pad, (1447) Autumn Terracotta stamp pad, (Z2192) Pacifica stamp pad, (Z280) Natural Hemp, (1385) White Daisy cardstock, Scrap of Grey Wool cardstock, Scrap of orange paper from my stashPin It
Enjoy Life:
Two Step Backgrounds:
I used the colors from The Play Date Cafe Challenge PDCC103 to help me along. I love that these colors can work for a masculine card yet there is no brown in them! It seems that I always revert to brown for masculine cards so it's nice to play with a brighter palette.

Here is the card I came up with.

Sunday, October 16, 2011
Lucky Little Pumpkin Studio J Layout
I've been neglecting my Studio J layouts! I usually place an order every month but didn't have time to last month with school (and work) starting up. I finally had some time to play and I was inspired by the Heart 2 Heart Challenge Blog. The challenge was to do a layout and journal/tell a story about your pictures. I had this idea in my head since Monday but only got a chance to work on it today! Anyway, it's about a cute little pumpkin that actually survived and grew in our tiny, somewhat dim backyard garden. Click on the picture and it should enlarge for you so you can read the journaling. Enjoy!
 Pin It

Fall Themed Treat Bag and Waxy Flax Quick Tip
During my last workshop, we made treat bags out of the Kraft Die-Cut Cards. This is what a card looks like without any embellishments.




Here is a card with an oval window cut out of the front with the Cricut Art Philosophy cartridge.

Check out this post from last Wednesday for Pamela O'Connor's directions on how to make the treat bags. Here is the embellished treat bag with fall themed papers and die-cuts. I still need to add a ribbon to the top to tie the flap shut (or you could add velcro underneath).


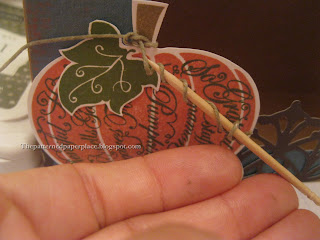
I wanted to show you a quick tip about Waxy Flax. It's a great embellishment for cards and layouts which doesn't add a lot of weight or bulk. One neat thing about Waxy Flax is that it can keep it's shape. So if you twirl it around a toothpick like this:

...it will hold it's shape like this:

Supplies used (all CTMH): (Z2135) New England Ivy stamp pad, (Z2191) Sunset stamp pad, (Z1686) Cricut Art Philosophy cartridge, (B1395) So Grateful stamp set, (X7142B) Dreamin' 2 paper pack, (1385) White Daisy cardstock, Olive Waxy Flax
Pin It
Subscribe to:
Posts (Atom)


 Posts
Posts


